Drywall Nail Pops: How To Fix Nail Pops in Your Drywall
- Drywall
- Hand Tools
How To Fix Drywall Nail Pops
Jan 06, 2022
-

Facebook -

Twitter -

Email

Whether you’re a new DIYer or a home improvement pro, few things are as gratifying as a perfectly smooth drywall job. And, few things are as frustrating as nail pops when they ruin that perfect plane. Luckily, learning how to fix drywall nail pops is a straightforward home repair and, with the right tools and know-how, is simple enough to do without calling a repairman.
Working with Drywall
Preview Course
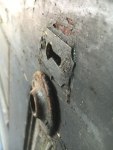
What are drywall nail pops?
Drywall installers hang wallboard on the wall or ceiling by driving nails or screws through the drywall and into the studs behind. The nail head (or screw) leaves a small dimple, and the installer fills that dimple with joint compound. As the house settles or as the framing lumber dries occurs, the wood moves, and the nails come loose or shift. When that happens, the compound hiding the fastener head cracks loose from the drywall and creates “nail pop.”
Usually, nail pop is wholly cosmetic, but it can indicate that the drywall installer used too few fasteners or didn’t drive them to the correct depth (too deep or too shallow). It can also be a sign of a structural problem, as the house might be settling more than it should. If cracks in drywall accompany nail pop, or it continues to happen over and over again, there might be a foundation problem, and you might to consult a structural engineer.
What tools do you need to fix drywall pops?
Drywall pops are an easy, DIY fix for which you will need:
- Pencil
- Drywall hammer and drywall nails
- Drill and drywall screw
- Putty knife
- Joint compound
- Sanding block
How to fix drywall nail pops
1. Find all the nail pops
It’s best to have all the nail pops pointed out before getting started, so you can fix them all at once. Run your hands over the wall surface to feel for any nail pops. Once you find them, circle them with a pencil so they’re more obvious.
2. Tap the fastener
If the fastener is a nail, a few light taps with a hammer should drive it back below the drywall’s surface. If these taps don’t work, it’s probably a screw. Use the drill fitted with a #2 Phillips bit to drive it back below the surface.
3. Scrape the drywall surface
Nail pops always leave some chunks of drywall compound or built-up paint behind, and you need to remove it to hide the drywall repair. Simply use the blade of the putty knife to scrape these bits off the wall in the damaged areas, leaving behind a smooth hole for an easier repair.
4. Secure the drywall with nails or screws
Since this drywall nail or screw has already worked its way through the surface, there’s a good chance it will happen again if you don’t secure the drywall. The easiest way the secure it is to drive a screw into the drywall an inch or two above the nail pop and another screw an inch or two below.

Whether you’re a new DIYer or a home improvement pro, few things are as gratifying as a perfectly smooth drywall job. And, few things are as frustrating as nail pops when they ruin that perfect plane. Luckily, learning how to fix drywall nail pops is a straightforward home repair and, with the right tools and know-how, is simple enough to do without calling a repairman.
Working with Drywall
Preview Course
What are drywall nail pops?
Drywall installers hang wallboard on the wall or ceiling by driving nails or screws through the drywall and into the studs behind. The nail head (or screw) leaves a small dimple, and the installer fills that dimple with joint compound. As the house settles or as the framing lumber dries occurs, the wood moves, and the nails come loose or shift. When that happens, the compound hiding the fastener head cracks loose from the drywall and creates “nail pop.”
Usually, nail pop is wholly cosmetic, but it can indicate that the drywall installer used too few fasteners or didn’t drive them to the correct depth (too deep or too shallow). It can also be a sign of a structural problem, as the house might be settling more than it should. If cracks in drywall accompany nail pop, or it continues to happen over and over again, there might be a foundation problem, and you might to consult a structural engineer.
What tools do you need to fix drywall pops?
Drywall pops are an easy, DIY fix for which you will need:
- Pencil
- Drywall hammer and drywall nails
- Drill and drywall screw
- Putty knife
- Joint compound
- Sanding block
How to fix drywall nail pops
1. Find all the nail pops
It’s best to have all the nail pops pointed out before getting started, so you can fix them all at once. Run your hands over the wall surface to feel for any nail pops. Once you find them, circle them with a pencil so they’re more obvious.
2. Tap the fastener
If the fastener is a nail, a few light taps with a hammer should drive it back below the drywall’s surface. If these taps don’t work, it’s probably a screw. Use the drill fitted with a #2 Phillips bit to drive it back below the surface.
3. Scrape the drywall surface
Nail pops always leave some chunks of drywall compound or built-up paint behind, and you need to remove it to hide the drywall repair. Simply use the blade of the putty knife to scrape these bits off the wall in the damaged areas, leaving behind a smooth hole for an easier repair.
4. Secure the drywall with nails or screws
Since this drywall nail or screw has already worked its way through the surface, there’s a good chance it will happen again if you don’t secure the drywall. The easiest way the secure it is to drive a screw into the drywall an inch or two above the nail pop and another screw an inch or two below.
Be sure not to overtighten the screws or you’ll create three new nail pops. The head of the screw should be just below the drywall surface so it’s unnoticeable when dragging a putty knife across the surface.
5. Hide the nail holes with joint compound
Scoop a small amount of joint compound onto the putty knife’s blade and swipe it across the nail holes, pushing the compound into the nail holes. After cleaning the putty knife off, hold it at a 45-degree angle to the wall and drag it back across the compound to remove the excess. Let it dry.
6. Sand the area
After the compound dries, use the sanding block (or sanding sponge) to give the repair area a light sanding. The point of this sanding is to remove the excess compound, but there will likely still be a dimple in the drywall in the repair area.
7. Apply another coat of joint compound
To really make those nail pops disappear, apply another coat of joint compound to the repair area. Use the same technique as before, pushing the compound into the repair area and removing the excess with a second swipe of the putty knife.
Once the final coat dries, sand the area again to create a smooth area of drywall. It’s a good idea to prime the repair area before painting to restore that bumpy drywall to its original splendor.
MT Copeland offers video-based online classes that give you a foundation in construction fundamentals with real-world applications, like installing drywall. Classes include professionally produced videos taught by practicing craftspeople, and supplementary downloads like quizzes, blueprints, and other materials to help you master the skills.
-
Facebook -
Twitter -
Email
Top Courses
How to Read Blueprints

Construction Math

Introduction to Cabinetry

Commercial Blueprints

How to Build Shaker Cabinets